Showing posts with label project. Show all posts

Sunday, October 28, 2012

Crocheted Beanie

My Favourite Things


Today's project is a simple beanie for 6 to 12 month olds.  I'm sure that the pattern could be adapted for an older child as well or even for an adult.  I like this pattern because it is quick and simple and also very adaptable.  Perfect for winter time and those upcoming Christmas/Hanukkah gifts!  Enjoy!

Crocheted Beanie

This project and/or pattern is not an original from me.  Please refer to the original author for details on selling or distributing the patterns or finished products.  I do not own this pattern and/or website linked to in this post.  Also, I will always specify on my blog which links will be affiliate links.  I promise that I will be upfront and honest about which links can generate me money directly.  Please don't hesitate to contact me with any questions.

Saturday, October 27, 2012

Pirate Granny Squares

Repeat Crafter Me


I love this idea!  If you are looking to make a blanket with granny squares for a boy this would be perfect.  It's boyish but still so cute and, in my short time crocheting, I haven't run across anything like this yet.  I think it's a perfect idea and with Christmas time coming up, would make a great gift for a grandson, nephew or son.  Click on the link to get the pattern from Repeat Crafter Me!

Pirate Granny Squares

This project and/or pattern is not an original from me.  Please refer to the original author for details on selling or distributing the patterns or finished products.  I do not own this pattern and/or website linked to in this post.  Also, I will always specify on my blog which links will be affiliate links.  I promise that I will be upfront and honest about which links can generate me money directly.  Please don't hesitate to contact me with any questions.

Thursday, October 25, 2012

Finished Rope Rug

Okay, I finally finished it!  I am really happy with the way that it came out too.  I think I might want to make it a little bigger since I am putting it somewhere other than where I originally had planned to.  I left the end unfinished so if I wanted to add more later I could.  I just need to go get more of the rope that I used.


It's a little uneven and it's not as perfect as I would like it but I am proud I finished it and I think that for my first time tackling a project like this it is pretty damn good!

Tuesday, October 23, 2012

Chunky Crocheted Basket Pattern

Crochet in Color


Today's project comes from Crochet in Color.  It's a very cute Chunky Crocheted Basket with handles!  I've had one go at a crocheted basket so far and let's just say that it was not all I hoped it would be :)  I really want to make one of these so I feel it being moved to the top of my project list very soon.  As always, I will be sure to post my next attempt at one.  The only reason I didn't post my first attempt was because I tried it before I started my blog.  Good luck!

This project and/or pattern is not an original from me.  Please refer to the original author for details on selling or distributing the patterns or finished products.  I do not own this pattern and/or website linked to in this post.  Also, I will always specify on my blog which links will be affiliate links.  I promise that I will be upfront and honest about which links can generate me money directly.  Please don't hesitate to contact me with any questions.

Monday, October 22, 2012

Crocheted Baby Blanket

Recently my friend's sister had a baby.  I have known my friend and her family for about 16 years so I almost feel like she is my sister too.  I am crocheting a baby blanket for her as a surprise and I am really excited about it.  I started out with this pink skein of really soft yarn but then I ran out.  I thought it would be big enough to do the whole blanket but it definitely is not!  I have another skein of the same yarn in purple so I will probably continue on in that.  Here is my progress so far.   


I'll be sure to post photos when I am all done!  It's not fancy but I wanted the stitches to be somewhat tight so it would be extra warm.  I basically started with a single crochet, the next row is a half double crochet, the next row is a double crochet and the last row is a triple crochet.  I have just been repeating that pattern over and over.  I'm pleased with how it is turning out and it's perfect timing since we are heading into winter here in upstate New York!

Thursday, October 18, 2012

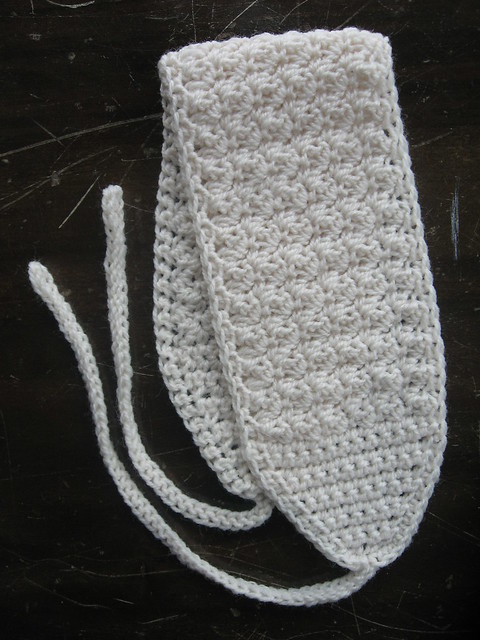
Crochet Winter Headband


Crochet Winter Headband

Well unfortunately it is that time of year again if you live in the northern part of the US.  Time for snow, cold, frost, freezing temps and all that other fun stuff!  I love the look of this headband.  I also love that you can tie it instead of having to slip it over your head.  I think you can get better placement this way.  Ladies, you know what I am talking about.  Click on the link above and it will take you right to the original blog post by Crochet Me  Enjoy!

This project and/or pattern is not an original from me.  Please refer to the original author for details on selling or distributing the patterns or finished products.  I do not own this pattern and/or website linked to in this post.  Also, I will always specify on my blog which links will be affiliate links.  I promise that I will be upfront and honest about which links can generate me money directly.  Please don't hesitate to contact me with any questions.

Thursday, October 11, 2012

Crocheted Rope Rug

Here it is.  The mother of all crochet hooks!  The size S.

I saw a really cool pattern for a rug that you crochet out of rope.  Seemed like a pretty ambitious project so I thought I would give it a try.  After purchasing my size S hook I searched for some rope.  After searching in a couple of places and finding that 300 yards of rope is going to be more money than I wanted to spend, I stopped over at Ocean State Job Lot and found some Mainstays clothesline (I thought that brand was Walmart but I could be wrong) which was much cheaper then anywhere else I had looked.  It was a good size, 3/16ths and 100 feet per roll.  I started out with 3 rolls to see how far that would get me and I am in to my second roll.  The pattern calls for the rug to come out to 4 feet wide which is a little wider then I would like so I may only use the 3.  I figured I can always get more if I need it.  This is my progress so far!
I'm not sure why those two gaps are there but they seemed to have disappeared since I've continued on.


It's pretty tiring for my hands, which are small to begin with, working with such stiff material and such a large hook but I am happy with my progress so far.  When I'm finished I will hide the end that you see sticking out in the middle of the beginning circle.  I stopped at this point because I had reached the end of the first roll of rope.  I taped and sewed the end of the rope to the beginning of the new roll of rope.  It came undone the first time I did it so I had to go back and tape it some more.  Hopefully this time it will stay.  I can't wait to show you the finished product!

Monday, September 24, 2012

Yoga Bag

So I bought the book, One-Yard Wonders: 101 Sewing Fabric Projects; Look How Much You Can Make with Just One Yard of Fabric! (affiliate link) and my friend Stephanie invited me over for a craft night.  I decided that since it would be my first sewing project, I wanted to start with something simple.  I found a pattern for a yoga mat bag and decided that since I have a yoga mat and no bag for it that would be my project for the night.  Unfortunately I didn't take pictures while I was at my friend's house of the measuring and cutting but I did photograph my progress while I was finishing the bag at my own house.  Here are all the pieces already cut, my sewing machine, my sewing kit and some of my living room in the background!  

Here's a close up of all the smaller pieces the pattern called for. 
The one thing that I did complete while I was at Steph's is the pocket for the outside of the bag.  It was very simple, just cut out two rectangles (I think the measurements were 8 inches x 6 inches), and sew the two "right" sides of the pocket together leaving one side open so you could flip it right side out.  Then press the open portion together and sew that closed.

Next you pin and sew the pocket to the front of the bag. 


Then you sew down the sides of the bag with the "right" sides facing together.
View of the bag now flipped "right" side out.


This is where I stopped following the pattern because I could not figure out the next instructions!  They wanted me to put the strap on the bag next and I couldn't figure out how they wanted me to do it so I improvised and just sewed the strap on the back seam of the bag a few inches from the top and bottom.

Next I sewed the bottom shut which was another improvisation from the original pattern.

This is the last step I completed.  I folded over and pressed the fabric at the top of the bag to make a clean edge.  The only thing I have to do now is take some elastic cord and fish it through at the top to make a drawstring and I will be done!

Monday, September 17, 2012

Finished Butterfly

So I finally finished my butterfly I was crocheting and I am proud to say that the second time around it turned out much better.  I'm looking forward to making more!

Here are the finishing photos.


Now I can add more embellishments if I want to.  Things like antennae, eyes, etc.  I was just happy to get it done and have it come out like the photo!

I've already started my next project and it's a sewing one this time.  I'm almost done with it so when I finish it up I will be sure to post my progression so you can see my first sewing attempt.